


Bird Panel Quilt Along Week 3 Blog Post 2

Quilt Sew Along Week 2
Hey everyone it's week 3 of a 5 blog post series, so this is blog post No.2. This will run over a 10 week process from start to finish of a making a quilt using my art panels of bird drawing i have done over the years.
Each blog post will have a mini sew along video, to show you how everything is sewn together.
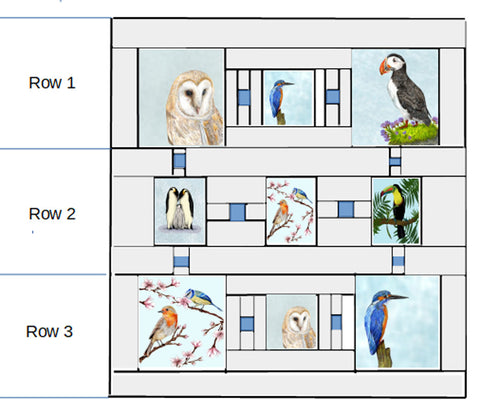
This is what the Quilt top will look like once finished

So, in the last blog post we did row one and row 3 this blog post is all about row 2 (that's the middle row with the small bird images and once this row is complete we will be joining all 3 rows together)
Here is the link to the last blog post if your joining it now
You will find what you will need on the last blog post to.
So let's get right into this weeks post
Making Row 2
Just like the last blog post there will be a link at the end of this blog post to the quilt along video for this blog as in this blog there is only measurements for cutting out and how the row will look like and the finished quilt top,Here is a few notes to help you.
Before i cut any of the fabric i pre shrink all my fabric. How i do this, i spray starch on all of the above pieces of fabric and using stream, set my iron to just over medium heat temp and press the fabric. Doing this will shrink the fabric and will not mess around with your measurements when you have to press your quilt blocks etc.
Label all the pieces as i have listed in each cutting out section on each blog post.
For cutting out i advise you to use a cutting mat, a rotary blade cutter and a good size quilting rule with inch measurements on.
Other than starch and the things i have listed for cutting out, i also use a 1/4 inch foot on my sewing machine, an iron and wool pressing mat (just a pressing mat or ironing board is needed), a size 90/14 sewing needle for my machine and i use Aurfil 40wt cotton thread.
Cutting Out Row 2
Cut 3x Small Bird Images from the bird panels cut at 9"w by 10"h(you don't have to use the same bird blocks as i have used in this order, you choose which order you like them to appear on the finished quilt)
Cut 6x Fabric A Pieces 2-1/2" by 2-1/2" Cut using the Contrast Fabric
Cut 12x Fabric B pieces 2-1/2" by 3" Cut using the main fabric
Cut 4x Fabric C pieces 4-3/4" by 7 3/4" Cut using the main fabric
Cut 2x Fabric D Pieces 10" by 10" Cut using the main fabric
Cut 4x Fabric E Pieces 4" by 11-1/2 " Cut using the main fabric
Cut 2x Fabric F Pieces 4" by 32-1/2 " Cut using the main Fabric
Here is what the finish Row labelled up will look like

Now you have seen this row labelled let get sewing this row together
Now you have completed row 2 lets sew together the quilt top
It's really easy following this diagram here sew row one bottom edge to the top of row 2, set the seam and press the seam open like i explain in the video. Then pin row 3 to the bottom edge of row 2 and sew together. Then press the seam open.
Now you should have a finish quilt top like mine

Now we have completed the quilt top lets join back here to make the quilt back where we will be using the last 2 large bird images and 1 small bird image plus we will be matching these up with the white fabric and some more contrast fabric.
The next blog post is due out the 9th November Tuesday yes it's a Tuesday next time due to I'm away the week before and have no way of getting access to my computer,
See you all next time
Happy Sewing
B
x