


Guest Take Over MEET LILY Part 1
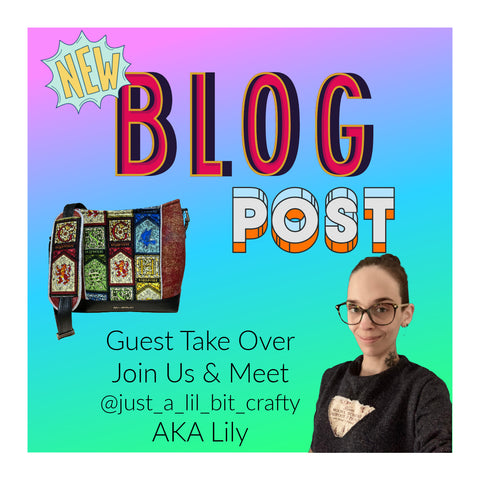

Hello everyone! My name is Lily and I am a craft blogger/YouTuber, you can find me on Instagram and on YouTube, I like to do reviews and sometimes craft tutorials on my channel, I am a true multi crafter, I will honestly try my hand at anything and everything that takes my fancy. I have now been sewing for nearly 4 years, I am completely self taught and have loved every second of it!! I have a chronic illness that causes me a lot of daily pain and exhaustion, amongst other things, so I use craft as a way of coping with it, my Mum was a huge crafter too and she taught me from a young age that while I might not be able to do everything that other kids my age can do there is always SOMETHING I can do, not only that she taught me to channel my pain and frustrations into my creations. I’m a firm believer that craft is therapy, both mental and physical and the feeling of accomplishment is honestly one of the biggest highs!
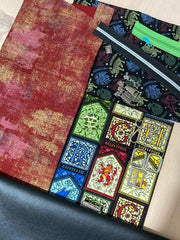
When the parcel arrived it was PACKED with goodies and it had literally everything I needed to make my bag, except the cotton fabrics, I had already chosen the perfect fabrics from my stash, I’m a huge Harry Potter fan and a Gryffindor so it was a no brainer for me to go with the Stained Glass house banners for the feature panels, Moda Grunge Metallics in this gorgeous burgundy for the sides and then this awesome house mascot constellations for the lining. All these fabrics complemented each other perfectly and looked amazing with the silver hardware and black PU that Becky had sent me, I had never used PU before so was definitely looking forward to trying a material that was a bit different.
Before starting a project I like to read the pattern through completely, I can happily confirm that the pattern is well written with lots of photo steps and I didn't feel lost or out of my depth once, I also watched Becky’s video tutorial on YouTube, it was so beyond helpful in helping me understand the construction of the bag and also where I could make any changes to the pattern without the bag losing any of its integrity, she shares so many tips and tricks in her videos so if you are ever working on one of her patterns and you’re unsure then head over to her YouTube channel, and if you’re still unsure or can’t quite find what you’re looking for then she has a pattern support group on Facebook where her and many other seasoned bag makers are ready and willing to help and give advice!
 challenge (in a good way) and it kept me focused when I was really struggling to focus on the most simple of tasks. As I mentioned earlier sewing with PU was a new experience for me, but with Becky’s hints and tips it was a breeze, as you can’t press PU the way you can cotton you need to use a roller/brayer and lots of wash away quilters tape and sewing clips (never use pins in PU) to keep everything in place while you sew it and to sew it you will need to use a teflon foot and a slightly longer stitch length, the teflon foot is an absolute miracle worker for sewing the PU and the longer stitch length is important so that you don’t perforate the PU too much, unlike cotton and other woven/knitted fabrics when you put a hole in PU it’s there forever so avoid unpicking and definitely no pins!! I can’t tell you how much I love the look of the black PU with my chosen fabrics, it just looks so clean and neat and it just works perfectly with the design of The On The Go pattern too.
I am quite a stubborn individual, I like to change things and make them more

Lily ;) so naturally I immediately saw the potential to change things up with this pattern… I’m going to talk you through some of the changes I made below, maybe it’ll inspire you to get a bit creative with your own bags! So I had this idea in my head of what I wanted to do and to make my ideas a reality it meant I had to change a few of the pattern pieces so that they matched up with my fabrics, I started with the pattern piece for the outer feature panels. The stained glass fabric has very defined sections with the house banners and I wanted to make sure I wasn’t going to end up with half a banner disappearing into the seams or something like that, it turned out that I needed to make my feature panels slightly wider in order to accommodate my fabric. It’s important to note that this works both ways and that you can make the feature panel slimmer and the side panels wider too, you just have to reverse the process and make sure that whatever you add/subtract from the feature panel is subtracted/added to the side panels to make sure that the overall finished measurements remain the same, otherwise the lining and the base pieces won’t fit.
I started by measuring the pattern piece and subtracting the seam allowance to see what visible area I was working with (as this pattern piece is on the fold you only have to subtract the seam allowance from the outer edge), I then measured my fabric across the banners making sure the Gryffindor banner was centred on the “On The Fold” edge as the main focal point and compared this to the pattern piece measurement. I then used my Swedish Tracing Paper to trace the pattern piece and used my quilting ruler to add the extra amount needed to the outside edge (Don’t worry about the top edge curve right now, I have a trick for that too!) luckily I only had to add a small amount to the pattern piece in order to fit in 3 of the banners without losing any of the details in the seam allowance, but obviously this will all depend on your fabric, just make sure this piece measures as wide as you want it for your fabric focal point PLUS the side seam allowance, you must also remember this pattern piece is on the fold unless you’ve drawn both sides to make the full pattern piece that is. Now for that top curve, luckily the pattern piece for the lining is all one piece so I just lined up what I had traced and used the top curved edge of that pattern piece to finish my custom pattern piece.
Now for the next piece, so because I edited the width of the pattern piece for that middle feature panel it means I have to adjust the side panel width too, it’s very simple all I had to do was subtract the same amount that I added to the feature panel from the side panel pattern piece, like I said it’s incredibly simple to do you just have to make sure you are removing it from the internal edge (the slightly shorter side that gets sewn to the feature panel) not the outside edge.

The final piece I had to adjust was the outer magnetic pocket width, there is no pattern piece just measurements as it’s a rectangle, but I wanted to pattern match my fabric so I did actually draw a pattern piece for this. I also decided to add another design feature here, as you can see from the photos I added piping to several areas on my bag including the top edge of this pocket, if you want to add piping to this pocket edge then you’ll need to do the pocket in 2 pieces rather that 1. To get the measurement for the piped pocket I needed to split the height measurement given in the pattern in half, add 1 lot of seam allowance for that top edge and then adjust the width to match my new feature panel pieces (if you just want to add piping and didn’t change the width of your feature panels then just use the width measurement given in the pattern), it’s important to note that if you do the piped pocket then you will need to cut 1 Outer Fabric and 1 Lining Fabric and 2 Interfacing. If you don’t want to add piping then you can just change the width of the pattern piece and continue as normal.
I wanted to pattern match the pocket fabric so I grabbed one of my feature panels that I had already cut out, lined up the bottom edge of my new pocket pattern piece and just traced off a few key focal points that I could use to locate the right part of the pattern repeat on my yardage. Once I had the pocket piece cut out I made sure to keep it with the correct feature panel so that I didn’t accidentally sew the wrong pieces together! This method works regardless of whether you added piping or not, however if you went with the all in one pocket then you’ll need to fold the pattern piece in half before tracing your matching points otherwise you might end up tracing on the lining side of the pattern piece and then it won’t match up.

To construct the pocket with piping I baste stitched the piping to the right side of the outer pocket piece then put the lining on top (right sides together) and stitched them together as close as possible to the piping using whatever seam allowance I used for the pattern piece, I then turned it right side out, folding the lining to the back, and pressed it really well and top stitched ⅛” from the top edge on the outer fabric side. As you can see I have also added piping in the vertical seams where the middle feature panel meets the side panels, to do this I just baste stitched the piping within the seam allowance on the feature panel before placing the side panel on top right sides together and sewing the pieces together according to Becky’s instructions. When I added the vertical piping to the back (the side with the magnetic pocket) I added the vertical piping after the pocket was done and baste stitched in place because otherwise the piping would have got trapped under the pocket piece and it just wouldn’t have worked.
For the rest of the bag I followed Becky’s instructions to the letter, there is an internal slip pocket and an internal zip pocket, which means plenty of room and storage for those all important things that seem to always get lost in the bottom of your bag! I had never sewn a zip bridge before this bag and I must admit it has become a firm favourite now, I think it’s such a professional looking closure and Becky makes it so simple and easy to achieve such an effective look. I love that Becky gives you the option of 2 different straps, a shoulder strap and an adjustable crossbody strap, in the pattern it tells you how to do a removable shoulder strap and a permanent crossbody strap, because I was going to make the strap shoulder pad for the crossbody strap I decided that I wanted both straps to be removable, I figured that if I ever wanted to swap the shoulder pad I would prefer to be able to just take it off rather than having to either cut the strap or cut the shoulder pad. To make the crossbody strap removable I literally just added swivel clips to the ends, I used the same method that Becky explains for the shoulder strap, if you want to do the removable strap too then it does mean you’ll need another 2 swivel clips these ones have to have a 1” d-ring/rectangle ring on the end as the crossbody strap is slightly wider than the shoulder strap. The pattern pieces for the shoulder pad are included in the pattern however the instructions to make it aren’t, there is a sew along video here on Becky’s YouTube channel and she also has them written on her blog here, it’s really simple and quick to make and your shoulder will thank you for making it when you inevitably overfill your bag!

I hope you enjoyed this post and found it helpful and/or informative, and hopefully it’ll encourage you to play around with patterns and fabrics! I am officially addicted to bag making, thank you Becky for encouraging me when I was in a low place, I hope I’ve done you and your pattern proud!!!
Thanks for reading!
Lily
Sandra Lamberti
Fantastic blog lily, I loved the way you explained it all. Beautiful bag too. Well done xxx
Jacqui Penman
I really enjoyed reading your blog. It’s so interesting to see the different ways people approach a project. Your bag looks amazing!
Poppet
Hi Lily, I loved your Youtube video on making this bag and I am definitely going to try some of the hacks you mentioned. :-) x
Maureen Vamplew
Not a coat an x pat I do make some real weird typo errors Sorry
Maureen Vamplew
A brilliant post
Love Becky patterns . Your bag is lovely .
I have just moved back to U.K. having been an coat for se real years x sewing machines arrived back inJuly Just started to get a seeing space sorted and am waiting for my horn seeing desk to arrive .Yes How lucky am I . Hope your sewing day today fills you with joy